
How to Paint Night Scenes: Techniques and Tips
Painting night scenes can feel like capturing a fleeting moment in time—a dance of shadows and light that tells a story all its own. Whether you're an experienced artist or just starting, understanding how to effectively portray the essence of nighttime is essential for creating captivating artwork. This article provides essential techniques and tips for painting captivating night scenes, exploring color palettes, lighting effects, and composition strategies to enhance your artwork's ambiance and depth.
Exploring the unique color palettes that define night scenes is the first step toward creating a mesmerizing piece. Nighttime is dominated by cool tones like deep blues, purples, and blacks, often punctuated by vibrant highlights. These colors not only set the mood but also enhance the realism of your painting. Think of night as a canvas where shadows play hide and seek with light. The contrast between dark and light can evoke emotions, making the viewer feel as if they are stepping into a different world. When choosing your palette, consider the following:
- Cool Colors: Emphasize blues, purples, and greens.
- Warm Highlights: Use yellows, oranges, and whites sparingly to create focal points.
- Deep Shadows: Incorporate blacks or very dark hues to give depth.
Light plays a crucial role in night scenes, acting as the guiding force that shapes the atmosphere. To effectively depict light sources, shadows, and reflections, you need to understand how they interact with each other. Imagine a street lamp casting a soft glow on the sidewalk; the light creates a warm pool, while the surrounding areas remain shrouded in darkness. This interplay of light and shadow is what makes your painting come alive. Here are some techniques to consider:
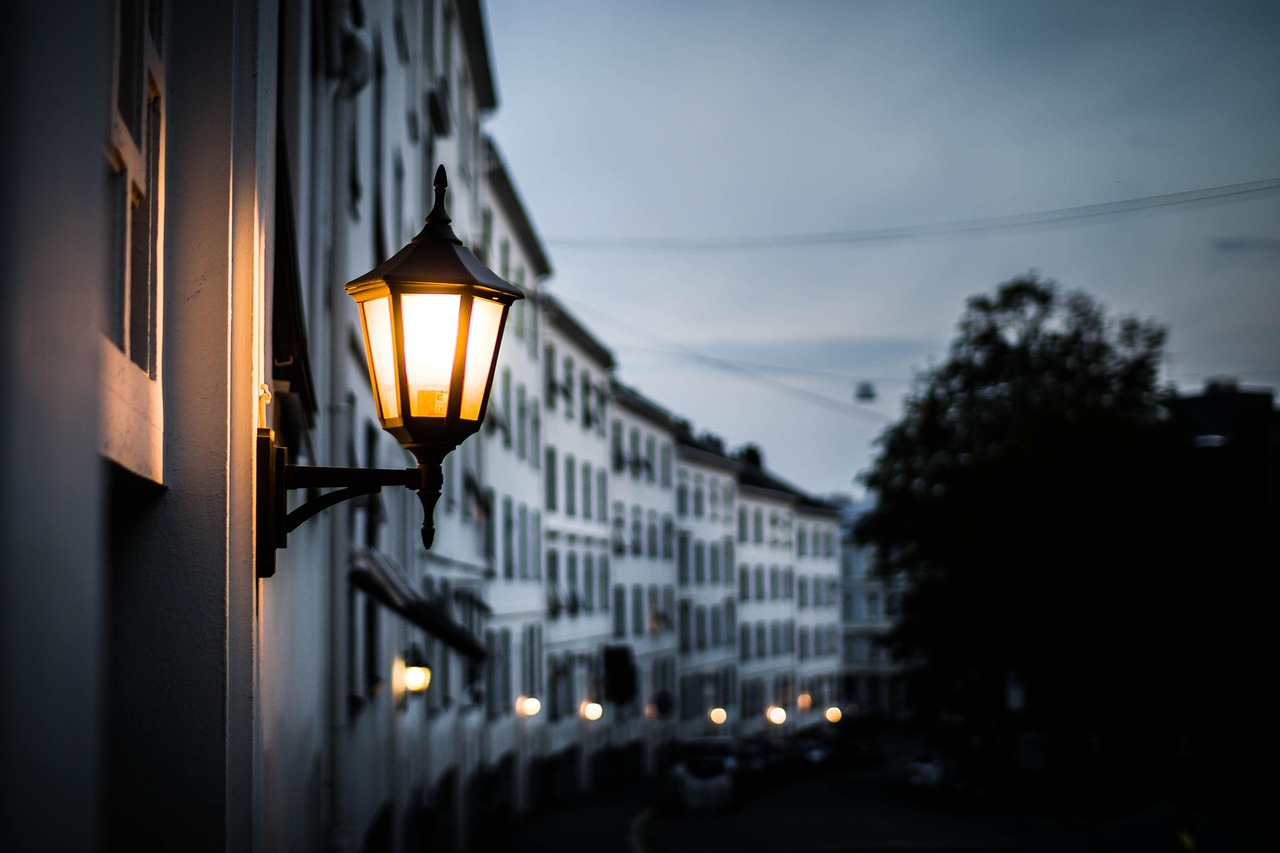
Artificial lights, such as street lamps or neon signs, can add vibrancy to your night scenes. These elements not only provide illumination but also create focal points that draw the viewer's eye. When incorporating artificial light, think about how it interacts with nearby objects. For instance, a street lamp might cast a warm glow on a nearby tree, creating a beautiful contrast with the cool night sky. Experiment with different angles and intensities of light to see how they transform your scene.
Understanding shadow placement and intensity is essential for realism. Shadows add depth and dimension, making your painting feel three-dimensional. Consider the following tips for effective shadow work:
- Observe real-life shadows at night to understand their shapes and sizes.
- Use a darker version of your local color for shadows to maintain harmony.
- Vary the intensity of shadows to create interest and guide the viewer's eye.
Reflections in water or on surfaces can add a magical touch to night scenes. Imagine a calm lake reflecting a starry sky—this can create a stunning visual effect. To achieve glowing effects, consider using glazing techniques to layer colors and build up intensity gradually. This method allows you to create a soft, luminous quality that captures the essence of nighttime.
A strong composition can elevate your night scene from ordinary to extraordinary. Think of composition as the backbone of your artwork—without it, even the most vibrant colors can fall flat. Use techniques like the rule of thirds or leading lines to draw the viewer's eye through the painting. Consider the placement of your light sources and shadows to create a narrative that engages the audience. A well-composed night scene not only captures attention but also invites the viewer to explore its depths.
The atmosphere is vital in night scenes, as it sets the mood and evokes emotions. Techniques such as blending, glazing, and layering can help you effectively capture the essence of nighttime settings. For instance, blending can soften harsh lines, creating a dreamy quality that mimics the gentle transition from day to night. Glazing allows you to build up layers of color, adding richness and depth to your work. Experiment with these techniques to see how they can transform your painting.
Weather can dramatically alter a night scene's atmosphere. Think about how fog can obscure details, creating a mysterious vibe, or how rain can add a reflective quality to surfaces. To incorporate weather elements, you might use a dry brush technique for fog or splatter paint for rain effects. Each weather condition tells a different story, so choose wisely based on the narrative you wish to convey in your artwork.
Texture adds realism and interest to your artwork, making it more engaging. Use various tools and techniques to create textures that enhance the overall effect of your night scenes. For example, a palette knife can create rough surfaces that mimic tree bark or rocky paths, while a sponge might be perfect for soft clouds or mist. The key is to experiment and find what works best for your vision.
Q: What colors should I use for a night scene?
A: Focus on cool tones like blues and purples, complemented by warm highlights for contrast.
Q: How can I create realistic shadows?
A: Observe real-life shadows at night, use darker versions of your local colors, and vary intensity for depth.
Q: What techniques can enhance the atmosphere of my night scene?
A: Techniques like blending, glazing, and layering can effectively capture the mood of nighttime settings.
Understanding Nighttime Color Palettes
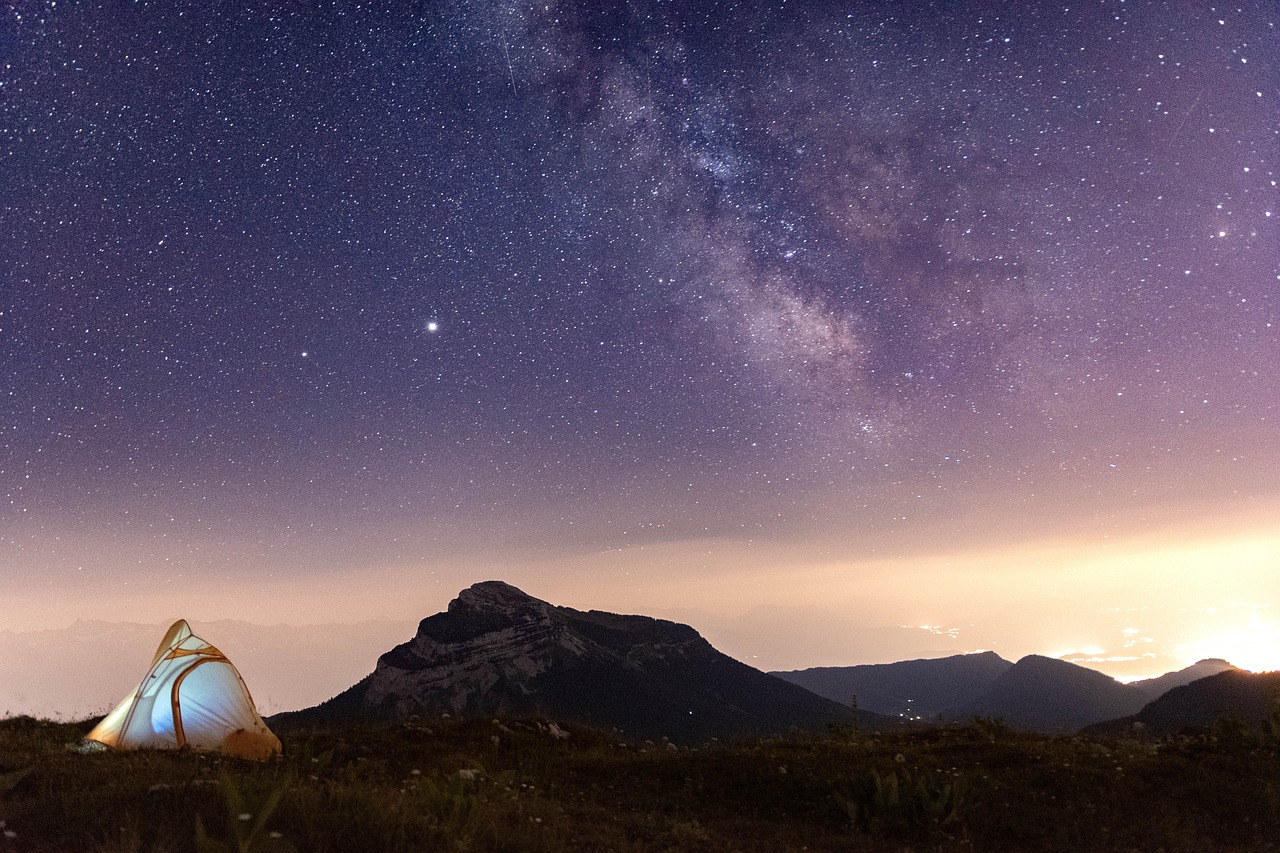
When it comes to painting night scenes, the color palette you choose can make or break the entire atmosphere of your artwork. Nighttime is often characterized by a unique blend of cool tones, deep shadows, and contrasting highlights. These elements work together to create the magical and often mysterious ambiance that night scenes are known for. Imagine stepping outside on a clear night, the sky a deep indigo, and the stars twinkling like diamonds. Capturing that feeling on canvas requires a thoughtful approach to color.
To start, let’s consider the essential colors that define nighttime. The most common hues include:
- Blues and Purples: These colors dominate the night sky and can evoke feelings of calm and serenity.
- Deep Greens: Used for shadows in foliage or buildings, they add depth and richness.
- Warm Yellows and Oranges: These colors can represent artificial light sources like street lamps or house lights, providing a stark contrast to the cooler tones.
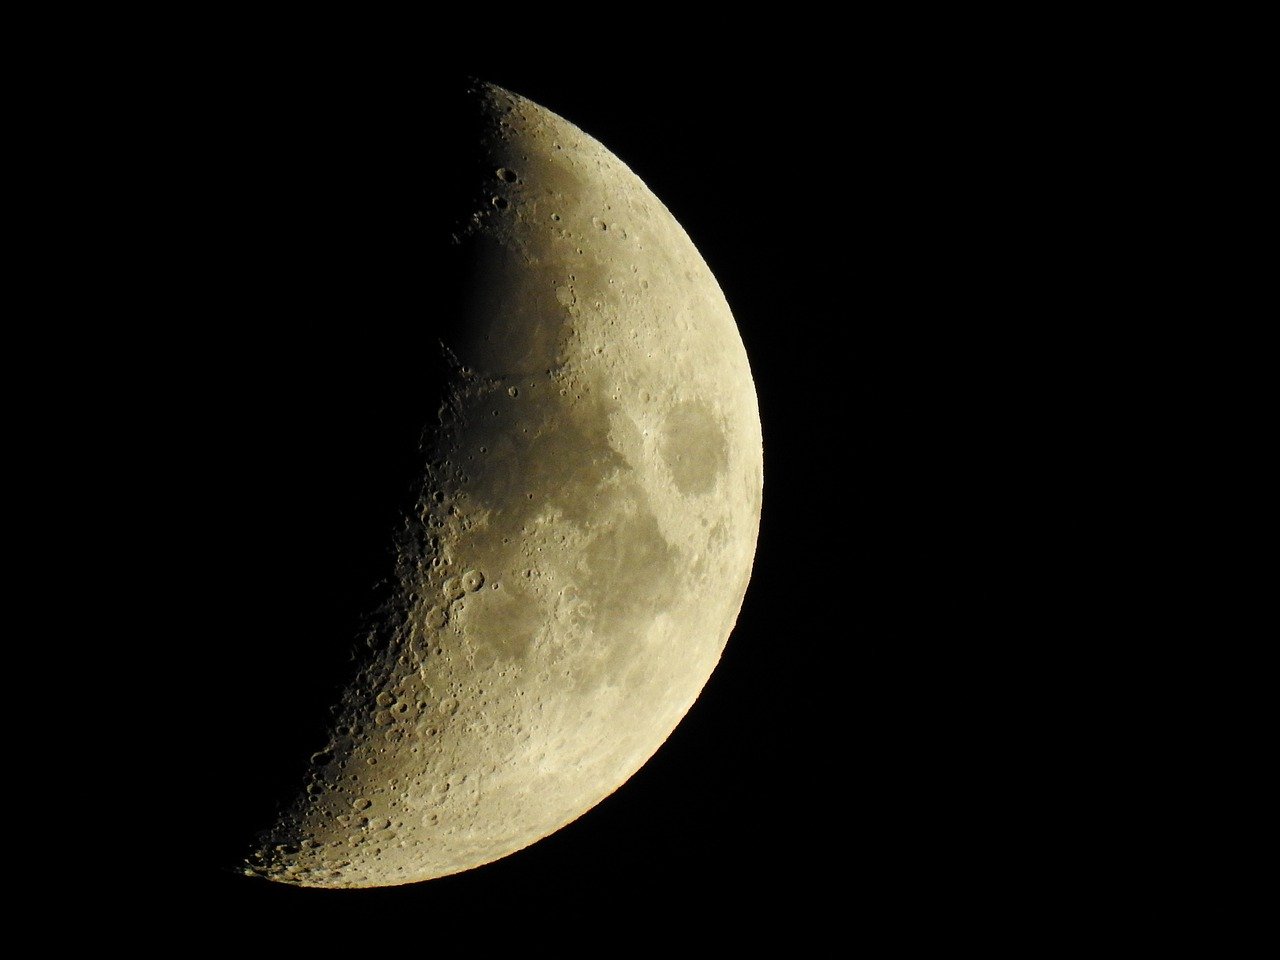
- Soft Whites and Silvers: These can be used to depict moonlight or reflections, adding a touch of magic to your scene.
When mixing your colors, consider the effects of color temperature. The cool tones of blues and purples can recede into the background, making them perfect for vast skies or distant landscapes. In contrast, the warm tones can draw the viewer's eye to focal points, such as a glowing window or a bustling street corner. This interplay between warm and cool is crucial for achieving a sense of depth and realism.
Another important aspect to consider is how light affects color perception at night. Under artificial light, colors can appear more saturated and vibrant. For instance, a street lamp might cast a golden glow that alters the colors of nearby objects. To mimic this effect, you can apply a glazing technique, where you layer transparent colors over dried paint to create a luminous effect. This technique can enhance the vibrancy of your palette and add a sense of realism to your night scene.
Finally, don’t forget about the impact of shadows. Shadows are not just dark areas; they can be rich with color and texture. A shadow cast by a tree, for example, might not be just black or gray; it could contain hints of deep blue or green, depending on the surrounding light sources. Incorporating these subtle variations into your shadows will add complexity and depth to your work.
In summary, understanding nighttime color palettes is all about balancing cool and warm tones, considering the effects of light on color perception, and embracing the rich hues found in shadows. By mastering these elements, you’ll not only enhance the mood of your paintings but also invite your viewers to step into the enchanting world of night.

Mastering Light and Shadow
When it comes to painting night scenes, light and shadow are your best friends. They help you create a sense of depth and drama that can make your artwork truly captivating. Imagine standing under a starry sky, the moon casting a silvery glow over everything, while shadows dance mysteriously in the corners of your vision. The way you depict light sources and shadows can transform a simple scene into something extraordinary. To master this aspect of your painting, you need to understand the interplay between light and dark.
First, let’s talk about the importance of light sources. In night scenes, light can come from various sources, whether it's the soft glow of the moon, the warm flicker of a street lamp, or the vibrant colors of neon signs. Each light source has its own character and can dramatically change the atmosphere of your painting. For instance, a warm yellow light can evoke feelings of comfort and nostalgia, while a cold blue light might create a sense of mystery or unease. To effectively depict these light sources, consider using a contrast technique where the brightness of the light is juxtaposed with the darkness of the shadows. This contrast not only enhances the realism but also helps guide the viewer’s eye through the scene.
Next, let’s dive into the shadows. Shadows are just as crucial as light in creating depth. They can add a sense of volume and dimension to your objects. When painting shadows, think about their direction and intensity. Shadows cast by a single light source tend to be sharper and more defined, while multiple light sources can create softer, more diffused shadows. Pay attention to the color of your shadows as well; they’re not just black or gray. In a night scene, shadows can take on hues from the surrounding light. For example, if a street lamp is casting yellow light, the shadow it creates might have a hint of purple or blue, depending on the ambient light in the area.
To further enhance your understanding of light and shadow, consider experimenting with reflections. Night scenes often include surfaces like water or shiny pavement that can reflect light. These reflections can add a magical quality to your artwork. When painting reflections, remember that they are usually distorted and less defined than the original object. Use softer brush strokes and lighter colors to capture this effect. The key is to maintain the overall mood of the scene while adding that extra layer of intrigue.
Here’s a quick summary of techniques to keep in mind when mastering light and shadow:
| Technique | Description |
|---|---|
| Contrast | Use light and dark colors to create depth. |
| Shadow Color | Incorporate hues from surrounding light sources in your shadows. |
| Reflections | Paint reflections with softer strokes and lighter colors. |
By paying close attention to how you use light and shadow, you can create night scenes that are not just visually stunning but also rich in narrative. Remember, the goal is to evoke emotion and tell a story through your artwork. So, the next time you sit down to paint, think about how you can manipulate light and shadow to enhance your scene. It’s all about creating that perfect balance that draws the viewer into your world.
- What are the best colors to use for night scenes? Generally, cool tones like blues and purples work well, but don’t hesitate to add warm highlights from light sources.
- How can I create a sense of depth in my night paintings? Use layers of color and varying shadow intensities to create a three-dimensional feel.
- Should I use black for shadows? Not necessarily. Experiment with dark blues, purples, or greens to give your shadows more life.
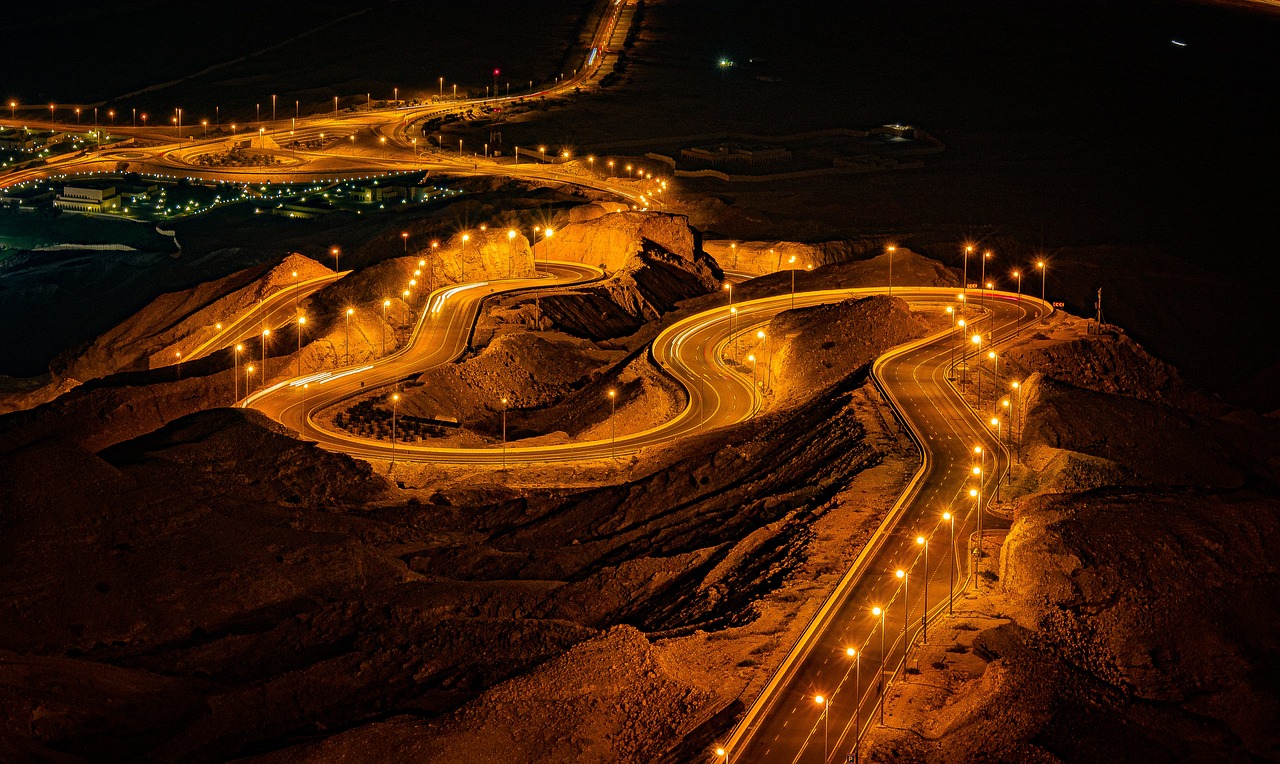
Using Artificial Light Sources
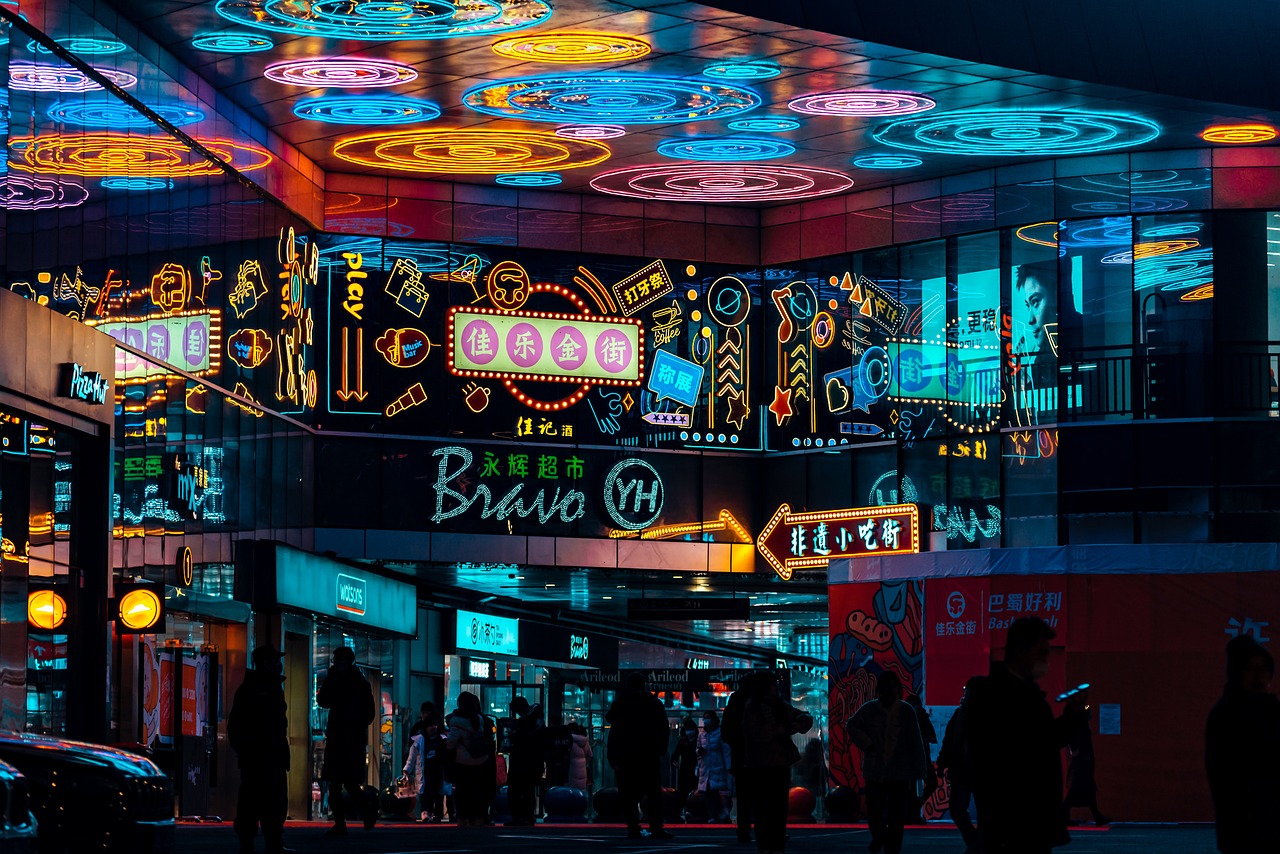
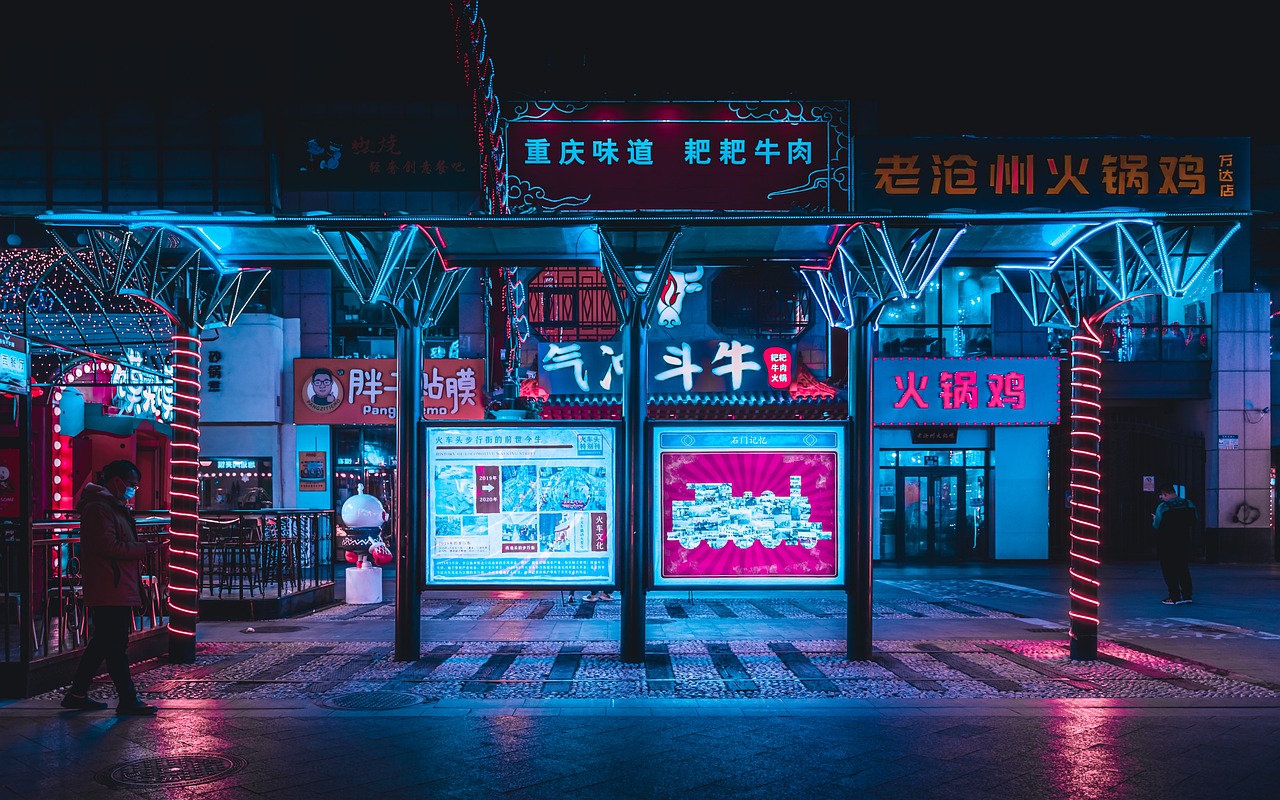
When it comes to painting night scenes, artificial light sources can be the secret ingredient that transforms your artwork from ordinary to extraordinary. Imagine the soft glow of a street lamp illuminating a cobblestone path or the vibrant hues of neon signs reflecting off a rainy sidewalk. These elements not only bring your painting to life but also create a captivating atmosphere that draws the viewer in. So, how do you effectively incorporate these artificial lights into your compositions?
First, it's essential to understand the color temperature of your light sources. Warm lights, like those from street lamps, emit a yellowish hue that can create a cozy and inviting feel. On the other hand, cooler lights, such as those from LED signs or moonlight, can evoke a sense of calm and mystery. By blending these color temperatures, you can create a dynamic scene that feels both realistic and engaging.
One technique to consider is using glazing. This involves applying thin layers of transparent paint over dried layers to build depth and luminosity. For instance, if you want to depict the warm glow of a lamp, start with a cool underpainting and gradually layer warm tones on top. This method allows the light to appear as if it’s emanating from within the scene, creating a stunning visual effect.
Another critical aspect is the placement of light sources. Think about how the light interacts with its surroundings. For example, a street lamp not only lights up the immediate area but also casts intriguing shadows and reflections. Pay attention to how these lights affect the colors and shapes around them. You might find that the light creates a play of contrasts that adds depth to your painting. Consider using a table to visualize the different effects of light on various objects:
| Light Source | Effect on Surroundings | Color Temperature |
|---|---|---|
| Street Lamp | Warm glow illuminating nearby objects | Warm (Yellow/Orange) |
| Neon Sign | Vibrant colors reflecting off wet surfaces | Cool (Pink/Blue) |
| Car Headlights | Harsh light creating sharp shadows | Neutral (White) |
Additionally, don't shy away from using highlights and reflections to enhance the impact of your artificial light sources. For instance, if you're painting a wet street, consider how the light from a nearby shop window might reflect off the puddles. These reflections can add a magical quality to your night scene, making it feel alive and vibrant.
Lastly, remember to embrace your creative instincts. While it's important to understand the fundamentals of light and shadow, don't hesitate to experiment. Sometimes the most captivating paintings come from breaking the rules and allowing your imagination to guide you. So grab your brushes, play with those light sources, and watch your night scenes come to life!
- What types of artificial light sources work best for night scenes? Street lamps, neon signs, and car headlights are great options as they provide varied color temperatures and effects.
- How can I make artificial light look realistic in my paintings? Focus on color temperature, shadow placement, and reflections to create a believable light source.
- Is glazing necessary for painting night scenes? While not necessary, glazing can enhance the luminosity and depth of your artificial light sources.

Creating Contrast with Shadows
When it comes to painting night scenes, one of the most powerful tools at your disposal is the use of contrast created by shadows. Shadows are not merely the absence of light; they are dynamic elements that can add depth and intrigue to your artwork. Think of shadows as the silent storytellers in your painting, whispering secrets about the shapes and forms that lie beneath the moonlight. By understanding how to create and manipulate shadows, you can transform a flat image into a vibrant, three-dimensional experience.
To effectively create contrast with shadows, it’s essential to consider the light source in your scene. Is it a soft, diffused glow from the moon, or is it a harsh, artificial light from a streetlamp? The nature of your light source will dictate the quality and direction of your shadows. For instance, a strong overhead light will cast short, sharp shadows, while a low light source will produce long, elongated shadows that stretch across the ground. This interplay of light and shadow is crucial for achieving a realistic night scene.
Here are a few techniques to help you create compelling shadows:
- Use a Limited Palette: To enhance the effect of shadows, consider using a limited color palette. Deep blues, purples, and blacks can serve as excellent base colors for shadows, allowing the highlights to pop against them.
- Layering Techniques: Build your shadows gradually using thin layers of paint. This technique allows you to control the intensity and depth of the shadow, making it feel more natural.
- Observe Real Life: Take a moment to step outside at night and observe how shadows behave in different environments. This real-world observation will inform your painting and help you create more believable shadows.
Another important aspect of shadow creation is understanding shadow placement. Shadows should not be arbitrary; they must correspond to the objects casting them. For example, if you have a tree in your scene, the shadow it casts should reflect its shape and the angle of the light source. This attention to detail can significantly enhance the realism of your painting.
Finally, don’t forget about the contrast between light and shadow. The more pronounced the difference, the more dramatic the effect. Use bright highlights to draw attention to specific areas of your painting, while allowing shadows to recede into the background. This technique not only creates a sense of depth but also guides the viewer’s eye through the composition, ensuring that they engage with your artwork on multiple levels.
In conclusion, mastering the art of creating contrast with shadows is essential for any artist looking to capture the magic of night scenes. By paying attention to light sources, layering techniques, and shadow placement, you can elevate your paintings from ordinary to extraordinary, inviting viewers to step into the enchanting world you’ve created.
Q: What colors are best for painting shadows in night scenes?
A: Deep blues, purples, and blacks are excellent choices for shadow colors, as they can create a sense of depth and contrast against lighter areas.
Q: How can I make my shadows look more realistic?
A: Observe how shadows behave in real life, use a limited color palette, and focus on shadow placement to enhance realism in your artwork.
Q: Should I use hard or soft edges for shadows?
A: It depends on the light source. Hard edges work well with strong light, while soft edges are more appropriate for diffused light sources.
Q: How do I incorporate reflections in my night scene?
A: To create reflections, consider the surface type (water, glass, etc.) and use lighter colors to mimic the light bouncing off these surfaces, enhancing the overall atmosphere.
Reflections and Glows
When it comes to painting night scenes, the magic often lies in the reflections and glows that dance across surfaces. These elements not only add a layer of intrigue but also create a sense of depth and realism that can transform a simple scene into something truly captivating. Imagine standing by a tranquil lake under a starry sky; the way the moonlight shimmers on the water's surface can evoke emotions that mere colors alone cannot express.
To effectively capture these glowing effects, it’s essential to understand the source of light in your painting. Whether it’s the soft glow of a street lamp, the vibrant hues of neon signs, or the ethereal light of the moon, each source will influence how reflections appear. For instance, the glow from a street lamp might cast a warm yellow hue on nearby surfaces, while moonlight could create cooler, bluish tones. This interplay between light and color is crucial in achieving a realistic portrayal.
One technique to consider is using a glazing method. By applying thin layers of translucent paint over dried layers, you can create a luminous effect that mimics the way light interacts with different surfaces. For example, a layer of transparent yellow over a dark blue base can create a glowing effect that resembles the light reflecting off water. Here’s a simple breakdown of the glazing process:
| Step | Description |
|---|---|
| 1 | Start with a dry base layer in a darker tone. |
| 2 | Mix your chosen color with a glazing medium. |
| 3 | Apply the glaze in thin layers, allowing each to dry before adding more. |
| 4 | Adjust the intensity by adding more layers as needed. |
Another important aspect to consider is the placement of reflections. Think about where the light source is located and how it interacts with the environment. For instance, if you’re painting a cityscape at night, reflections on wet pavement can create a stunning visual effect. You might want to use a soft brush to blend the colors where the light meets the surface, creating a smooth transition that mimics the way light diffuses in real life.
Don’t forget about the glow that can emanate from these light sources. To achieve a glowing effect, you can use a technique called dry brushing. This involves using a dry brush with very little paint to lightly touch the surface of your canvas. This technique can help create that soft, diffused look that makes lights appear to shimmer. Remember, less is often more when it comes to creating glow; a subtle touch can have a more significant impact than an overly bright application.
In summary, reflections and glows are essential elements that can elevate your night scenes from ordinary to extraordinary. By paying close attention to your light sources, employing glazing techniques, and carefully placing reflections, you can create a dynamic and enchanting atmosphere in your artwork. So, the next time you sit down to paint a night scene, remember to let the light guide you and watch your canvas come alive with shimmering reflections and magical glows!
- What colors work best for depicting night scenes? Cool tones like blues and purples are ideal, often complemented by warm highlights from artificial lights.
- How can I create realistic reflections in my paintings? Pay attention to the light source, use glazing techniques, and consider the surface texture where the reflection occurs.
- What tools can I use to create glowing effects? A dry brush technique or a sponge can be effective for soft, glowing applications.
Choosing the Right Composition
When it comes to painting night scenes, composition is your secret weapon. It’s not just about slapping some paint on a canvas; it’s about crafting a visual story that pulls the viewer in. Think of your composition as the foundation of a house; without a solid base, everything else can crumble. You want to create a layout that guides the eye and evokes emotion, making your night scene not just seen, but felt.
One effective way to achieve this is by using the rule of thirds. Imagine your canvas divided into nine equal parts by two vertical and two horizontal lines. Placing key elements along these lines or at their intersections can create a more balanced and engaging composition. For instance, if you’re painting a city skyline at night, consider positioning the horizon along the lower third of the canvas. This allows for a more dramatic sky filled with stars or a glowing moon, enhancing the nighttime ambiance.
Another technique to consider is the use of leading lines. These are lines that naturally draw the viewer's eye towards the focal point of your painting. Whether it’s the path of a winding road illuminated by streetlights or the reflection of lights on water, leading lines can create a sense of depth and movement. They guide the viewer through your artwork, making them feel as if they are stepping into the scene themselves.
Don't forget about framing. This involves using elements within your scene to create a 'frame' around your main subject. For example, you might use tree branches or buildings to encase the glowing lights of a city street. This technique not only adds depth but also focuses the viewer's attention on the key aspects of your painting. It’s like putting a spotlight on your subject, making it stand out against the night sky.
Finally, consider the balance of your composition. A well-balanced painting feels harmonious, while an unbalanced one can create tension and chaos. You can achieve balance through symmetry, where both sides of the painting mirror each other, or through asymmetry, where different elements are arranged in a way that still feels visually appealing. For instance, placing a bright street lamp on one side can be balanced by a darker, more subdued area on the opposite side.
To sum it up, choosing the right composition is all about creating a visual narrative that captivates your audience. Whether you’re using the rule of thirds, leading lines, framing, or balance, each technique plays a crucial role in bringing your night scene to life. So grab your brushes and start experimenting! Your canvas is waiting.
- What is the rule of thirds? The rule of thirds is a composition guideline that suggests dividing your canvas into nine equal parts and placing key elements along these lines to create balance.
- How can I create depth in my night scene? You can create depth by using leading lines, framing elements, and varying the size and placement of objects in your composition.
- What colors should I use for night scenes? Cool tones like blues and purples combined with warm highlights from artificial light sources can enhance the nighttime effect.
Techniques for Capturing Atmosphere
Capturing the atmosphere in a night scene is like trying to bottle up a whisper of magic. The way you blend colors, layer your paints, and even the tools you choose can transform a simple canvas into a mesmerizing landscape that draws the viewer in. One of the most effective techniques is blending. This method allows you to create smooth transitions between colors, mimicking the soft glow of moonlight or the gentle haze of a foggy night. Use a soft brush to gently mix the edges of your colors, creating a seamless gradient that evokes the serene beauty of nighttime.
Another technique to consider is glazing. This involves applying thin layers of transparent paint over dried layers. The result? A rich depth that can make your night scene come alive. Imagine the way the sky shifts from a deep navy to a lighter blue as the stars twinkle above; glazing can help you achieve that ethereal effect. By layering colors, you not only add complexity but also enhance the luminosity of your artwork, making it feel as if it’s glowing from within.
Don't underestimate the power of layering as well. This technique allows you to build up texture and detail gradually, giving your painting a sense of depth and realism. For instance, when painting a night sky, start with a dark base and gradually add lighter shades or even flecks of white for stars. This step-by-step approach can help you create a captivating atmosphere that feels both authentic and dreamlike.
To really enhance the atmosphere, consider incorporating weather elements. Weather can dramatically change the mood of your painting. A clear night filled with stars feels different from a foggy evening where shapes are obscured. Think about how you can portray these elements:
- Fog: Use soft, muted colors and blending techniques to create a sense of mystery.
- Rain: Incorporate streaks or drips in your painting to mimic wet surfaces, reflecting light in unique ways.
- Stars: Use a small brush to dot the sky with white or pale yellow for a twinkling effect.
Additionally, experimenting with textures can add another layer of atmosphere to your work. Textures can evoke feelings and sensations; for instance, a rough texture can suggest a gritty urban scene, while a smooth finish might convey a peaceful, calm setting. You can create textures using various tools—from palette knives to sponges. Each tool will give you a different effect, so don’t be afraid to play around until you find what resonates with you.
In summary, capturing atmosphere in your night scenes involves a mix of techniques that work harmoniously together. By mastering blending, glazing, layering, and incorporating weather elements, you can create a rich, immersive experience for your viewers. Remember, the atmosphere is what makes your painting come alive, so take your time and let your creativity flow!
Q: What colors should I use for a night scene?
A: Cool tones like deep blues, purples, and blacks work well for night scenes, complemented by pops of warmer colors for lights and highlights.
Q: How can I make my night scene look more realistic?
A: Focus on the interplay of light and shadow, and don't forget to include reflections and atmospheric elements like fog or stars.
Q: What tools are best for creating textures in night scenes?
A: Experiment with various tools such as palette knives, sponges, and brushes to achieve different textural effects that enhance your artwork.
Incorporating Weather Elements
When it comes to painting night scenes, the weather can be your best friend or your worst enemy. It has the power to transform a simple landscape into a breathtaking masterpiece by adding layers of complexity and emotion. Imagine the difference between a clear starry night and a foggy evening—both are beautiful, yet they evoke completely different feelings. So, how do you incorporate these weather elements into your artwork? Let’s dive into some exciting techniques!
First off, fog can create a sense of mystery and depth. When painting fog, consider using soft, muted colors to depict how it envelops the landscape. A light wash of gray or blue can work wonders. Start with a base layer of your chosen color and gradually build up the fog effect by layering lighter shades. This technique not only softens the edges of objects but also adds an ethereal quality to your scene. Remember, the key is to maintain transparency while allowing some details to peek through, creating a sense of intrigue.
Next, let’s talk about rain. A rainy night can be both dramatic and serene. To capture the essence of rain, you might want to use a combination of techniques. Start by painting the wet ground with reflective surfaces that mimic the glistening effect of rain. Use a glossy medium or a high-gloss varnish to enhance this effect. Additionally, consider adding streaks of white or light blue to represent raindrops falling through the air. This can give the illusion of movement and create a dynamic atmosphere that draws the viewer in.
Another fascinating element to incorporate is stars. A starry night sky can be the focal point of your painting. Use a dark blue or black background and gently dab white paint to create stars. For an added touch, you can even use a toothbrush to flick tiny splatters of white paint across the canvas, mimicking the twinkling effect of distant stars. This technique can evoke a sense of wonder and vastness, making your night scene feel alive and expansive.
Lastly, consider the impact of moonlight. The moon can cast a soft glow that highlights certain areas of your painting. When depicting moonlight, use cooler colors like silvery whites and soft blues. Focus on the areas where the light hits and create gentle gradients to portray the light’s subtle transitions. This not only adds dimension but also enhances the overall ambiance of your night scene.
Incorporating weather elements into your night scenes can elevate your artwork from ordinary to extraordinary. By thoughtfully blending techniques for fog, rain, stars, and moonlight, you can create an atmosphere that resonates with viewers on an emotional level. Remember, the goal is to evoke feelings and draw your audience into the world you’ve created. So, don’t shy away from experimenting with these elements; the results may surprise you!
- What colors should I use for painting fog? Soft, muted colors like light grays and blues work best to create an ethereal effect.
- How can I make rain look realistic in my painting? Use reflective surfaces and add streaks of white or light blue to depict raindrops effectively.
- What techniques can I use to paint a starry night sky? A dark background with dabs of white paint or splatters can create a twinkling star effect.
- How do I depict moonlight in my artwork? Utilize cooler colors like silvery whites and soft blues, and focus on creating gradients to show light transitions.
Experimenting with Textures
This article provides essential techniques and tips for painting captivating night scenes, exploring color palettes, lighting effects, and composition strategies to enhance your artwork's ambiance and depth.
Exploring the unique color palettes that define night scenes, including cool tones, deep shadows, and contrasting highlights, can significantly impact the mood and realism of your painting.
Light plays a crucial role in night scenes. This section will cover how to effectively depict light sources, shadows, and reflections to create a dynamic and engaging composition.
Artificial lights, such as street lamps or neon signs, can add vibrancy to your night scenes. Learn how to incorporate these elements to enhance the visual interest in your artwork.
Understanding shadow placement and intensity is essential for realism. This subheading will guide you on how to create depth through strategic shadow work in your paintings.
Reflections in water or on surfaces can add a magical touch to night scenes. Discover techniques for painting glowing effects and reflections to enrich your compositions.
A strong composition can elevate your night scene. This section will discuss various compositional techniques to draw the viewer's eye and create an engaging narrative within your artwork.
The atmosphere is vital in night scenes. This part will explore techniques such as blending, glazing, and layering to effectively capture the mood and essence of nighttime settings.
Weather can dramatically alter a night scene's atmosphere. Learn how to incorporate elements like fog, rain, or stars to add depth and complexity to your paintings.
When it comes to painting night scenes, textures can be your secret weapon. They add a layer of realism and enhance the overall visual impact of your artwork. Think about how the textures of different surfaces interact with light at night. For instance, a wet pavement might reflect light differently than a dry one, creating varied effects that can captivate the viewer's eye.
One effective way to experiment with textures is to use a variety of tools. Brushes are a given, but consider incorporating sponges, palette knives, or even your fingers to achieve unique effects. Each tool offers a different way to manipulate paint on the canvas. For example, a sponge can create soft, diffused edges that mimic the look of fog, while a palette knife can produce sharp, crisp lines that might represent the edges of a building illuminated by streetlights.
Additionally, layering is crucial. Start with a base layer that sets the tone of your night scene. This could be a deep blue for the sky or a muted gray for the ground. Once dry, you can add additional layers of texture. Here are some techniques to consider:
- Glazing: Apply thin, transparent layers of paint to build depth. This technique can help you achieve the illusion of light filtering through clouds or the shimmer of moonlight on water.
- Dry Brushing: Use a dry brush to lightly apply paint over a textured surface. This can highlight the texture and create a sense of movement, like the flicker of light across a rough surface.
- Impasto: Apply thick layers of paint to create a three-dimensional effect. This technique can be particularly effective for painting bright lights or reflections that seem to pop off the canvas.
Ultimately, the key to mastering textures in night scenes is to experiment. Don’t be afraid to try out different materials and methods. Each painting is an opportunity to explore new techniques and discover what works best for you. Remember, the more you play with textures, the more your night scenes will come alive, inviting viewers to step into the enchanting world you've created.
Q: What materials are best for painting night scenes?
A: Use high-quality acrylics or oils for rich colors and blending capabilities. Don't forget tools like sponges and palette knives for texture!
Q: How can I make my night scenes look more realistic?
A: Focus on light and shadow, use a limited color palette, and experiment with textures to create depth and atmosphere.
Q: Is it necessary to use artificial light sources?
A: While not necessary, incorporating artificial light sources can add vibrancy and interest to your night scenes, enhancing the overall composition.
Q: How do I choose the right color palette for a night scene?
A: Opt for cool tones like blues and purples, combined with contrasting warm highlights to create depth and interest.
Frequently Asked Questions
- What color palettes work best for night scenes?
When painting night scenes, it's essential to use cool tones like blues and purples, along with deep shadows and contrasting highlights. These colors help create a moody atmosphere that reflects the essence of nighttime. Don't forget to incorporate pops of warm colors from artificial light sources to add vibrancy and depth!
- How can I effectively depict light and shadow in my paintings?
To master light and shadow, start by identifying your light sources. Use lighter shades to represent areas hit by light and darker tones for shadows. Remember, shadows should be soft and gradual for realism. Experiment with different intensities and placements to add depth and dimension to your artwork!
- What techniques can I use to create reflections in my night scenes?
Reflections are magical in night scenes! To achieve this, focus on the surface where the reflection occurs, like water or shiny pavements. Use lighter colors for the reflection, and consider adding a slight blur or distortion to mimic the natural effect of light on water. This will make your scene feel more immersive!
- How do I choose the right composition for my night scene?
A strong composition is key! Use techniques like the rule of thirds to position focal points effectively. Leading lines can guide the viewer's eye through the painting, creating a narrative. Don't hesitate to experiment with different angles and perspectives to see what feels right for your artwork!
- Can weather elements enhance the atmosphere of my painting?
Absolutely! Incorporating weather elements like fog, rain, or stars can dramatically change the mood of your night scene. For instance, fog can soften edges and create a sense of mystery, while rain can add texture and movement. Play around with these elements to enrich your composition!
- What are some tips for adding texture to my night scenes?
Texture can elevate your painting! Use tools like sponges, brushes, or even your fingers to create various textures. Try layering techniques with different mediums to achieve depth, whether it’s the roughness of a brick wall or the smoothness of water. Don't be afraid to experiment and find what works best for your style!


