
Creating Simple Wooden Flower Boxes: A DIY Guide
Welcome to the wonderful world of DIY! If you’ve ever dreamed of adding a touch of nature to your home or garden, creating your own wooden flower boxes is a fantastic way to do just that. Not only do they provide a beautiful way to showcase your favorite plants, but they also allow you to express your creativity and craftsmanship. This guide will walk you through the essential steps and materials needed to create beautiful wooden flower boxes, perfect for enhancing your garden or home decor. So, grab your tools, roll up your sleeves, and let’s dive into this exciting project!
Selecting the appropriate type of wood is crucial for durability and aesthetics. When it comes to building flower boxes, you want materials that can withstand the elements while still looking good. Some popular choices include:
- Cedar: Naturally resistant to rot and insects, cedar is a fantastic choice for outdoor flower boxes.
- Redwood: Similar to cedar, redwood has excellent durability and a beautiful color that enhances any garden.
- Pine: A more affordable option, pine is easy to work with but requires sealing to prevent decay.
Each type of wood has its unique benefits, so consider your budget and the look you want to achieve when making your selection. Remember, the right wood will not only enhance the beauty of your flower boxes but also ensure they last for years to come.
Gathering the right tools and materials is key to a successful DIY project. Here’s what you’ll need to create your wooden flower boxes:
- Wood: Your chosen type of wood cut to size.
- Screws or nails: To hold your flower box together.
- Wood glue: For added strength.
- Sealant: To protect your flower box from the elements.
Having these materials on hand will make your project go smoothly and efficiently.
Familiarize yourself with the essential hand tools required for building flower boxes. Understanding their use will make the process smoother and more efficient. Here are some basic hand tools you’ll need:
- Hand saw: For cutting your wood pieces.
- Drill: To create holes for screws or nails.
- Screwdriver: For fastening the screws.
- Measuring tape: To ensure accurate measurements.
Different saws serve various purposes in woodworking. A hand saw is perfect for simple cuts, while a miter saw can help you make angled cuts for a more intricate design. Understanding the type of cuts you need will guide you in choosing the right saw for your project.
Accurate measurements are vital for a well-constructed flower box. A measuring tape and square will help you achieve precise dimensions, ensuring that all pieces fit together seamlessly. Remember, “measure twice, cut once” is a motto that can save you from costly mistakes!
Power tools can significantly speed up the construction process. If you have access to them, consider using a power saw for quicker cuts and a power drill for efficient fastening. These tools can make your project not only faster but also more enjoyable.
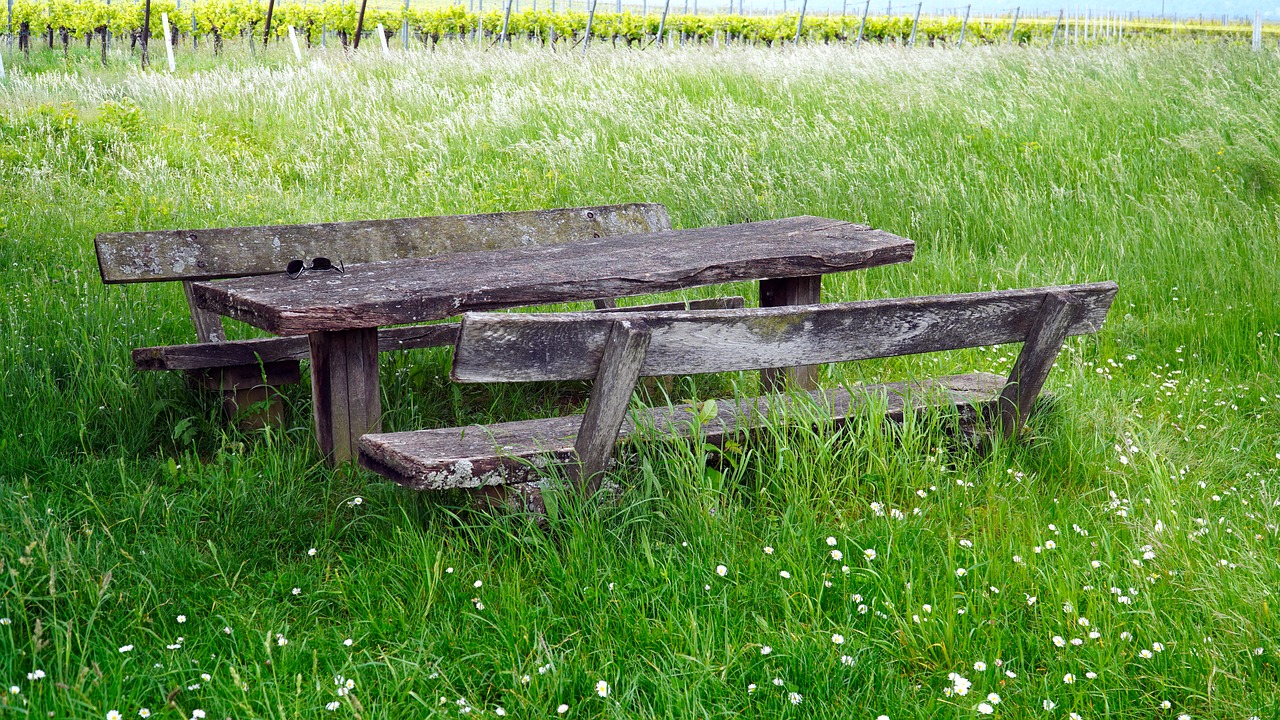
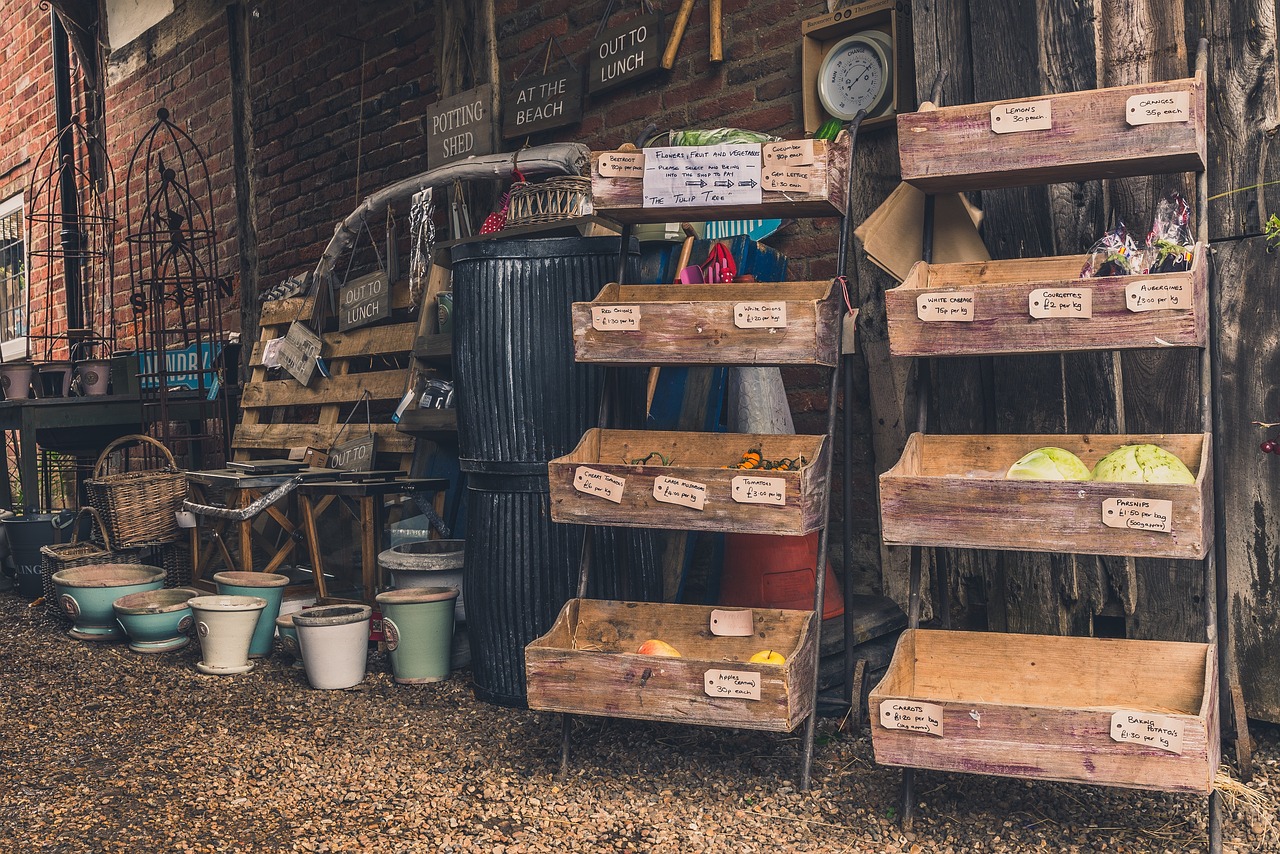
A well-thought-out design can elevate the appearance of your flower box. Here, we discuss design considerations and creative ideas to inspire your project. Think about the size and shape that will best fit your space and the plants you want to display.
The size and shape of your flower box will depend on your available space and plants. A long, narrow box might be perfect for a window sill, while a larger, square box could serve as a centerpiece on your patio. Explore various dimensions and styles to suit your needs and preferences.
Incorporating personal touches into your design adds uniqueness. Consider painting your flower box in vibrant colors, staining it for a rustic look, or even adding stencils for a fun pattern. These little details can transform your flower box from ordinary to extraordinary!
Follow a detailed step-by-step guide to assembling your flower box. This section will ensure you understand each stage of the construction process. Let’s get started!
Cutting the wood accurately is the first step in assembly. Use your measuring tape to mark where you’ll cut, and take your time to ensure precision. A clean cut will make it easier to assemble the pieces later on.
Learn how to properly assemble the cut pieces into a cohesive flower box. Start by joining the sides, then attach the bottom. Use screws or nails to secure the structure effectively. Don’t forget to use wood glue for added strength!
Adding finishing touches can enhance the aesthetics and longevity of your flower box. Once your box is assembled, it’s time to seal and decorate it. Explore various methods for sealing and decorating your creation.
Sealing your flower box is essential for protecting it from the elements. Options include wood sealants, paints, or stains that provide a protective layer against moisture and UV rays. Choose a product that suits your wood type and desired finish.
Explore creative decorative options to personalize your flower box further. From stencils to natural finishes, discover ways to make your project truly yours. You could even add decorative stones or plants that complement your design!
Q: How long will my flower box last?
A: The lifespan of your flower box depends on the type of wood used and how well it is maintained. Proper sealing and care can extend its life significantly.
Q: Can I use treated wood for my flower box?
A: While treated wood is durable, it may contain chemicals that can leach into the soil. If you choose treated wood, consider lining the box with a plastic barrier.
Q: What plants are best for flower boxes?
A: The best plants depend on your climate and the amount of sunlight your flower box receives. Herbs, flowers, and even small vegetables can thrive in a well-constructed flower box.
Choosing the Right Wood
When it comes to creating your own wooden flower boxes, is absolutely crucial. Not only does the type of wood you select affect the overall look of your flower boxes, but it also plays a significant role in their durability and longevity. Think of it like choosing the right ingredients for a recipe; the better the quality, the more delicious the final product. So, what are your options? Let’s dive into the different types of wood that can elevate your DIY project.
First off, you might consider cedar. This wood is a popular choice among DIY enthusiasts for good reason. Cedar is naturally resistant to decay and insects, making it an ideal candidate for outdoor projects. Its beautiful reddish hue can also add a touch of elegance to your garden. Just imagine a vibrant flower box that not only showcases your plants but also complements your outdoor decor!
Another excellent option is redwood. Similar to cedar, redwood boasts natural resistance to rot and pests. It has a stunning grain pattern that can truly make your flower box stand out. However, keep in mind that redwood can be a bit pricier than other options, so it’s important to weigh your budget against your aesthetic goals.
For those looking for a more economical choice, pine might be the way to go. Pine is readily available and inexpensive, making it a favorite for many DIY projects. While it may not have the same durability as cedar or redwood, treating it with a good sealant can enhance its lifespan. Plus, pine can be easily painted or stained, allowing for a custom look that fits your style.
If you’re feeling adventurous, consider using plywood. This versatile material can be cut into various shapes and sizes, making it perfect for unique designs. Just remember to use exterior-grade plywood to ensure it can withstand the elements. With a little creativity, you can transform plywood into a stunning flower box that showcases your personality.
In summary, when choosing the right wood for your flower boxes, consider the following factors:
- Durability: How well will the wood hold up against weather conditions?
- Aesthetics: Does the wood complement your existing decor?
- Budget: What are you willing to spend on materials?
Ultimately, the choice of wood will depend on your personal preferences and the specific needs of your project. Whether you opt for the classic beauty of cedar, the rich tones of redwood, the affordability of pine, or the versatility of plywood, each type of wood has its unique charm. So, take your time, weigh your options, and get ready to create a stunning flower box that will be the envy of all your neighbors!
Q: Can I use treated lumber for my flower boxes?
A: While treated lumber is durable, it often contains chemicals that can leach into the soil. For safety, especially if you're planting edible plants, consider using untreated wood or lining the inside with a plastic barrier.
Q: How do I maintain my wooden flower box?
A: Regularly check for signs of rot or damage. Applying a sealant every couple of years can help protect the wood from moisture and prolong its life.
Q: What is the best way to paint or stain my flower box?
A: Make sure to use outdoor-rated paint or stain. Apply a primer first if you’re using paint, and allow each coat to dry completely before applying the next for the best results.
Essential Tools and Materials
When embarking on your journey to create beautiful wooden flower boxes, having the right tools and materials is absolutely essential. Think of it like preparing for a big adventure; you wouldn't want to head out without the necessary gear, right? So, let’s dive into what you need to gather before you start cutting and assembling your wooden masterpiece.
First off, you’ll want to choose the right type of wood. Popular choices include cedar, redwood, and pine. Cedar and redwood are excellent for outdoor use due to their natural resistance to rot and insects, while pine is a budget-friendly option that can be treated for durability. Each type has its own unique charm, so consider what fits best with your garden or home decor.
Next, let’s talk about tools. Having the right tools will not only make your project easier but also more enjoyable. Here’s a quick rundown of the basic hand tools you’ll need:
- Saw: A handsaw or miter saw will be essential for cutting the wood to size.
- Drill: A power drill will help you create holes for screws and drainage.
- Screwdriver: A good-quality screwdriver will be necessary for assembling the box.
- Measuring Tape: Accurate measurements are crucial, so a measuring tape is a must-have.
- Square: This tool ensures your corners are perfectly right-angled.
Now, if you’re feeling a bit adventurous and want to speed up the process, consider adding some power tools to your arsenal. While hand tools are great, power tools can significantly cut down on labor time. A power saw can make quick work of cutting, while a power drill will make assembling your flower box a breeze. Trust me, once you start using power tools, you’ll wonder how you ever managed without them!
In addition to tools, you’ll need some materials to bring your vision to life. Here’s a handy table summarizing the essential materials:
| Material | Purpose |
|---|---|
| Wood | For the structure of the flower box |
| Screws | To hold the pieces together |
| Wood Glue | For added strength in joints |
| Sealant | To protect the wood from weather damage |
| Paint/Stain | For aesthetics and protection |
Once you have all your tools and materials ready, you’re well on your way to creating something beautiful. Remember, the key to a successful DIY project is preparation. So, gather your supplies, roll up your sleeves, and get ready to unleash your creativity. Your garden (and your flower boxes) will thank you for it!
As you embark on your DIY flower box project, you might have some questions. Here are a few frequently asked questions to help guide you:
- What type of wood should I use for outdoor flower boxes? Cedar and redwood are excellent choices due to their natural resistance to rot.
- Do I need to treat the wood before planting? Yes, sealing and treating the wood can help extend its lifespan.
- How do I ensure proper drainage in my flower box? Drill holes in the bottom of the box to allow water to escape.
Basic Hand Tools
When it comes to crafting your own wooden flower boxes, having the right hand tools can make all the difference. Think of your tools as the trusty sidekicks in your DIY adventure; they’re essential for transforming your vision into reality! You don’t need to be a master carpenter to get started, but familiarizing yourself with a few basic hand tools will not only make the process smoother but also more enjoyable.
First up, let’s talk about the hand saw. This tool is your go-to for making straight cuts through wood. While power saws are great, a hand saw gives you that satisfying feeling of control and precision. You might wonder what type of hand saw to choose. Well, a crosscut saw is perfect for cutting across the grain, while a rip saw is designed for cutting along the grain. Each has its own unique purpose, so having both can be beneficial.
Next, you’ll need a measuring tape. Precision is key in woodworking, and a measuring tape helps you achieve just that. Imagine trying to fit a piece of wood that’s a fraction of an inch too long—frustrating, right? With a reliable measuring tape, you can avoid such mishaps. Pair it with a square to ensure your corners are perfectly right-angled. This is crucial for maintaining the overall shape of your flower box.
Another essential tool is the chisel. This nifty tool is perfect for adding details or making adjustments to your cuts. Think of it as your artistic brush for wood—allowing you to refine and enhance the design of your flower box. You’ll also want a hammer for securing nails and a screwdriver for any screws you might use. These tools are the backbone of your assembly process, ensuring everything holds together firmly.
Finally, don’t forget about the importance of a clamp. As you assemble your flower box, clamps will hold your pieces in place while you work, preventing any unwanted shifts. It’s like having an extra set of hands—so you can focus on getting those joints just right. With these basic hand tools at your side, you’ll be well-equipped to tackle your wooden flower box project with confidence!
Q: Do I need a lot of experience to build a flower box?
A: Not at all! This project is perfect for beginners. Just take your time, follow the steps, and you’ll do great!
Q: What type of wood is best for outdoor flower boxes?
A: Cedar and redwood are excellent choices due to their natural resistance to rot. However, treated pine is also a popular and cost-effective option.
Q: How long will my flower box last?
A: With proper sealing and care, a well-constructed flower box can last for several years, even outdoors.
Q: Can I customize my flower box design?
A: Absolutely! Personal touches like paint, stain, or decorative elements can make your flower box uniquely yours.
Saw Types
When it comes to woodworking, choosing the right saw can make all the difference between a smooth, enjoyable experience and a frustrating one. There are various types of saws designed for specific tasks, and understanding their purposes is essential for any DIY enthusiast looking to create beautiful wooden flower boxes. First off, let’s talk about the hand saw. This classic tool is perfect for making precise cuts in small projects. Its simplicity allows for great control, but it does require a bit of elbow grease.
Next up is the miter saw, which is fantastic for making angled cuts. If you’re looking to create a flower box with a more intricate design, a miter saw can help you achieve those perfect corners. It’s like having a personal assistant that ensures every angle is just right. For those who want to speed up the process, a circular saw is a powerful option. This saw can cut through thick wood quickly, making it ideal for larger projects. However, it’s crucial to handle it with care, as it can be quite intimidating for beginners.
Another tool to consider is the jigsaw. This versatile saw is perfect for making curved cuts and intricate shapes, allowing you to get creative with your flower box design. Imagine crafting a box with beautiful, flowing lines that mimic the natural curves of the flowers you plan to plant. Lastly, there’s the table saw, a must-have for serious woodworkers. It provides unparalleled precision and can handle large sheets of wood with ease. However, it does require a bit more space and setup, so it’s best suited for those who plan to dive deeper into woodworking.
To summarize, here’s a quick comparison of the saw types:
| Saw Type | Best For | Portability |
|---|---|---|
| Hand Saw | Precise cuts in small projects | Highly portable |
| Miter Saw | Angled cuts | Moderate portability |
| Circular Saw | Quick cuts in thick wood | Portable |
| Jigsaw | Curved and intricate cuts | Portable |
| Table Saw | Precision cuts in large sheets | Not portable |
In conclusion, selecting the right saw for your flower box project will not only enhance your efficiency but also elevate the quality of your work. So, whether you're a seasoned pro or just starting, make sure to choose the saw that best fits your needs and watch your DIY project flourish!
Measuring Tools
When it comes to crafting your wooden flower boxes, accuracy is key. The right measuring tools will not only save you time but also ensure that your project turns out exactly as you envisioned. Think of measuring tools as the compass for your woodworking journey; without them, you might end up lost in a sea of uneven cuts and misaligned boards. So, let's dive into the essential measuring tools that will help you achieve precision in your DIY flower box project.
First and foremost, a tape measure is indispensable. It’s flexible, portable, and can easily wrap around corners, making it perfect for measuring the dimensions of your flower box and the space where it will sit. Remember, a good tape measure should have clear markings and a sturdy blade that won’t bend easily.
Next, consider investing in a square. This tool helps ensure that your corners are perfectly right-angled, which is crucial for a well-constructed box. Using a square will help you avoid the common pitfall of having a flower box that looks more like a parallelogram than a rectangle. Additionally, a level is essential for checking that your box sits evenly on any surface. This is especially important if your garden or patio isn’t perfectly flat.
For more detailed measurements, a caliper can be incredibly useful. It allows you to measure the thickness of wood pieces accurately, ensuring that all your cuts are consistent. This tool is particularly handy when you’re working with multiple boards that need to fit together snugly.
Lastly, don’t overlook the importance of a marking tool, such as a carpenter's pencil or a chalk line. These tools will help you make clear, visible marks on your wood, which can be easily followed when cutting. A sharp pencil mark can be the difference between a clean cut and a jagged edge, so choose wisely!
To summarize, here’s a quick table of the essential measuring tools you’ll need for your flower box project:
| Tool | Purpose |
|---|---|
| Tape Measure | For measuring lengths and widths accurately. |
| Square | Ensures right angles for precise corners. |
| Level | Checks if your box sits evenly on surfaces. |
| Caliper | Measures the thickness of wood for consistency. |
| Marking Tool | Makes clear marks for cutting guidance. |
By equipping yourself with these measuring tools, you’ll set a strong foundation for your flower box project. Remember, taking the time to measure accurately will pay off in the long run, resulting in a beautiful and sturdy addition to your garden or home.
Power Tools
This guide will walk you through the essential steps and materials needed to create beautiful wooden flower boxes, perfect for enhancing your garden or home decor.
Selecting the appropriate type of wood is crucial for durability and aesthetics. Explore different wood options and their benefits for your flower box project.
Gathering the right tools and materials is key to a successful DIY project. This section outlines everything you’ll need to create your wooden flower boxes.
Familiarize yourself with the essential hand tools required for building flower boxes. Understanding their use will make the process smoother and more efficient.
Different saws serve various purposes in woodworking. Learn about the types of saws you might need for cutting wood accurately.
Accurate measurements are vital for a well-constructed flower box. Discover the measuring tools that can help ensure precision in your project.
Power tools can significantly speed up the construction process, making them invaluable for any DIY enthusiast. When it comes to building wooden flower boxes, having the right power tools can transform a tedious task into a smooth and enjoyable experience. For starters, a circular saw is a must-have for making straight and precise cuts. Imagine slicing through wood like a hot knife through butter—this tool will make your life so much easier!
Another essential power tool is the drill. Not only will it help you create pilot holes for screws, but it will also allow you to attach various components of your flower box securely. Think of it as the magic wand that binds your project together. Additionally, a sander will come in handy to smooth out rough edges and give your flower box that polished look. You want your creation to be as inviting as the flowers you plan to plant in it, right?
Here’s a quick overview of the main power tools you might consider:
| Power Tool | Function |
|---|---|
| Circular Saw | For making straight cuts in wood |
| Drill | To create holes and secure components |
| Sander | To smooth edges and surfaces |
Using power tools not only saves time but also enhances the quality of your work. Just remember, safety first! Always wear protective gear such as goggles and gloves when handling any power tools. It’s like putting on your superhero cape before embarking on your DIY adventure—essential for keeping you safe while you create!
A well-thought-out design can elevate the appearance of your flower box. Here, we discuss design considerations and creative ideas to inspire your project.
The size and shape of your flower box will depend on your available space and plants. Explore various dimensions and styles to suit your needs.
Incorporating personal touches into your design adds uniqueness. Learn about painting, staining, and embellishing options to make your flower box stand out.
Follow a detailed step-by-step guide to assembling your flower box. This section will ensure you understand each stage of the construction process.
Cutting the wood accurately is the first step in assembly. Discover tips for making precise cuts to ensure a perfect fit.
Learn how to properly assemble the cut pieces into a cohesive flower box. This includes joining techniques and securing the structure effectively.
Adding finishing touches can enhance the aesthetics and longevity of your flower box. Explore various methods for sealing and decorating your creation.
Sealing your flower box is essential for protecting it from the elements. Understand the different sealing options available and their benefits.
Explore creative decorative options to personalize your flower box further. From stencils to natural finishes, discover ways to make your project truly yours.
Q: What type of wood is best for outdoor flower boxes?
A: Cedar and redwood are excellent choices for outdoor flower boxes due to their natural resistance to rot and insects.
Q: How do I ensure my flower box lasts a long time?
A: Proper sealing and using quality materials can significantly extend the lifespan of your flower box.
Q: Can I customize the size of my flower box?
A: Absolutely! You can adjust the dimensions based on your available space and the plants you wish to grow.
Designing Your Flower Box
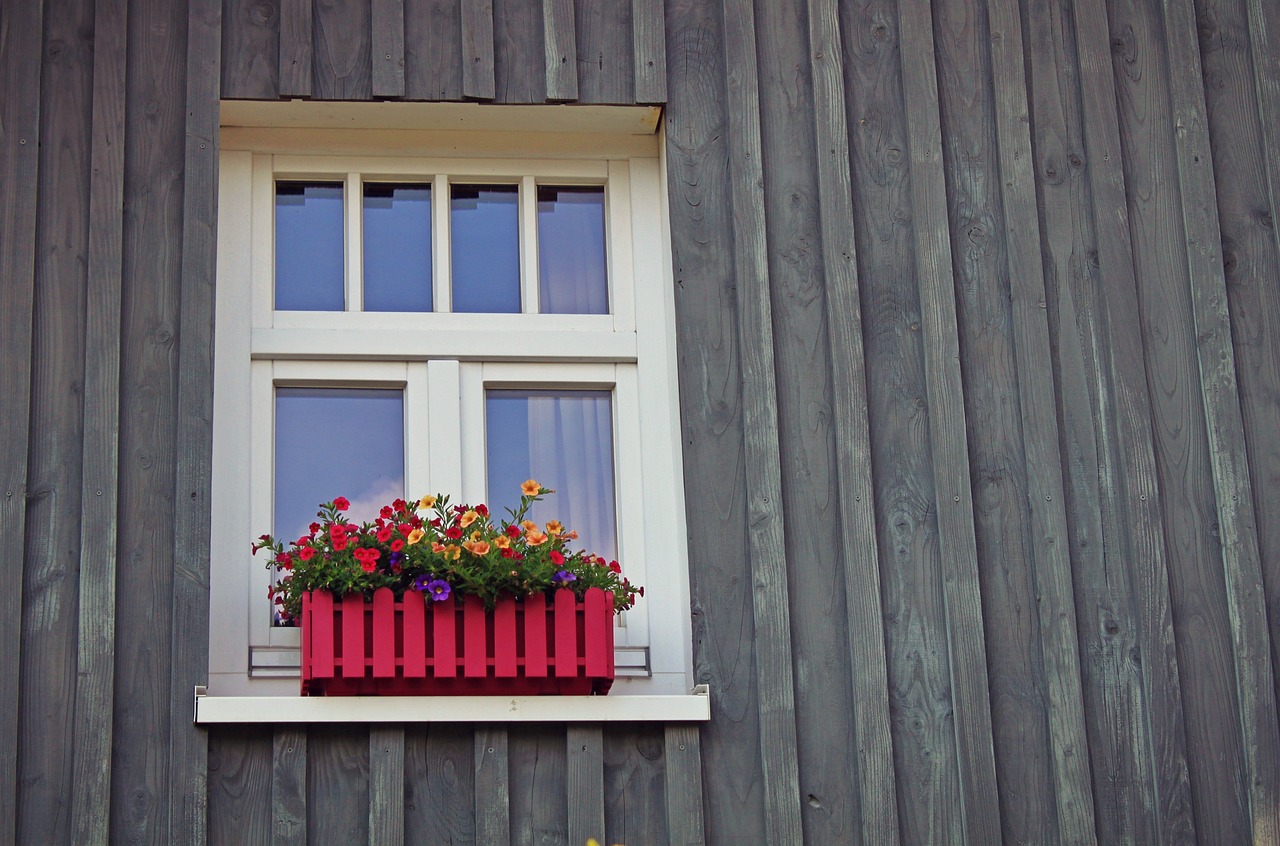
Designing your flower box is where the real magic begins! It’s like painting a blank canvas; you have the freedom to create something beautiful and unique. First, consider the size and shape of your flower box. These elements will largely depend on the space you have available and the types of plants you wish to display. For instance, if you have a small balcony, a long, narrow box might be perfect for trailing plants, while a larger garden could accommodate a wider, more substantial box filled with vibrant flowers. The possibilities are endless!
When it comes to size, think about the dimensions that will fit comfortably in your chosen spot. A good rule of thumb is to ensure that your flower box is at least 12 inches deep; this allows for proper root growth. As for shape, you can go traditional with rectangular boxes or get creative with circular or even tiered designs that can add a touch of flair to your garden.
Next, let’s talk about incorporating personal touches into your design. This is where you can really let your personality shine! Whether it's through painting, staining, or adding embellishments, these details can transform a simple wooden box into a stunning centerpiece. You might consider using stencils to create designs on the sides of your box, or perhaps you want to stain the wood to highlight its natural grain. The choice is yours, and it can make all the difference in how your flower box complements your home or garden.
Moreover, think about the plants you want to place in your flower box. Different plants have varying needs for sunlight, water, and space, so it’s essential to choose compatible species. For example, if you’re planning to grow herbs, consider a box that allows for easy access and drainage. On the other hand, if you’re looking to create a vibrant display of flowers, think about incorporating a mix of heights and colors to create visual interest. Grouping plants with similar care requirements can also simplify your gardening routine!
Finally, don’t forget about drainage! A well-designed flower box should have adequate drainage holes to prevent water from pooling at the bottom, which can lead to root rot. You can easily achieve this by drilling a few holes in the bottom of your box before planting. This small step ensures that your plants will thrive and that your beautiful design won’t be ruined by water damage.
In summary, designing your flower box is an exciting opportunity to express your creativity while enhancing your outdoor space. By considering size, shape, personal touches, plant selection, and drainage, you’ll be well on your way to creating a stunning floral display that not only beautifies your environment but also brings joy every time you see it.
Here are some common questions people have when designing their flower boxes:
- What type of wood is best for flower boxes? Cedar and redwood are great choices due to their natural resistance to decay.
- How deep should my flower box be? A depth of at least 12 inches is recommended for most flowers and plants.
- Can I use regular paint on my flower box? It’s best to use weather-resistant outdoor paint or stain to protect the wood.
- How often should I water my flower box? This depends on the plants you choose, but a general rule is to check the soil moisture regularly.
Size and Shape
When it comes to creating your wooden flower box, are two of the most critical factors to consider. Imagine your flower box as a canvas; its dimensions and form can dramatically influence the overall aesthetic of your garden or patio. Before diving into the construction, take a moment to think about where you plan to place your flower box. Is it going to sit on a balcony, nestled in a corner of your garden, or perhaps as a centerpiece on your patio? Each location will dictate different size requirements.
Generally, flower boxes come in a variety of shapes, including rectangular, square, and even circular designs. Rectangular boxes are often favored for their versatility; they can fit snugly against walls or fences, making them perfect for smaller spaces. On the other hand, square boxes can create a more symmetrical look, which is great for larger gardens or as standalone features. If you’re feeling adventurous, a circular or even an irregularly shaped box can add a unique flair to your outdoor decor.
Now, let’s talk about dimensions. Here are some common sizes to consider:
| Shape | Typical Dimensions (inches) | Best For |
|---|---|---|
| Rectangular | 24 x 12 | Small spaces, herbs |
| Square | 18 x 18 | Medium-sized flowers, decorative |
| Circular | 24 | Unique designs, focal points |
While selecting the size, keep in mind the types of plants you wish to grow. Different plants have varying root depths and widths, which can affect how much space they need. For example, if you're planning to grow larger plants like sunflowers or tomatoes, you’ll want a deeper box to accommodate their roots. Conversely, if you’re opting for smaller flowers like petunias or pansies, a shallower box will suffice.
Also, consider the height of your flower box. A taller box can create a stunning visual impact, especially if it’s elevated on legs or placed on a table. This height not only makes it easier to tend to your plants but also adds dimension to your garden. However, be cautious—an overly tall box might look out of place in a compact area, so balance is key.
Ultimately, the size and shape of your flower box should reflect your personal style while also catering to the needs of your plants. Don’t hesitate to sketch out your ideas or even use a piece of string to visualize the dimensions in your chosen location. This way, you can ensure that your flower box will be both functional and aesthetically pleasing. Remember, the goal is to create a beautiful space that brings joy and life to your surroundings!

Adding Personal Touches
When it comes to creating your wooden flower box, adding personal touches is what transforms a simple project into a unique masterpiece. Think of your flower box as a blank canvas, waiting for your creative flair to breathe life into it. Whether you're a seasoned DIY enthusiast or a curious beginner, there are countless ways to infuse your personality into the design.
One of the most straightforward methods to personalize your flower box is through color. You can choose to paint your box in vibrant shades that reflect your style or opt for muted tones that blend seamlessly with your garden. If you're feeling adventurous, consider using a combination of colors to create a gradient effect or even a fun pattern. Remember, the only limit is your imagination!
Staining is another fantastic option that not only enhances the wood's natural beauty but also provides a protective layer. This method allows the grain of the wood to show through, giving your flower box a rustic charm. You can experiment with various stain colors—think rich mahogany, deep walnut, or even a light oak finish—to find the perfect match for your outdoor or indoor decor.
For those who enjoy a bit of artistry, consider using stencils or decals. These can be used to add quotes, designs, or even your family name to the sides of your flower box. This approach not only personalizes your project but also makes it a conversation starter. Imagine guests admiring your handiwork and asking where you got that lovely box with your name on it!
Another creative idea is to incorporate natural elements into your design. You might attach small pieces of driftwood or twigs to the corners of your box for a nature-inspired look. Alternatively, consider using stones or pebbles to create a decorative border around the base of the flower box. These natural touches can enhance the overall aesthetic and make your flower box feel more connected to the environment.
Lastly, don't forget about the plants themselves! Choosing unique flowers or plants that resonate with you can significantly impact the overall look of your flower box. Whether you opt for vibrant annuals, fragrant herbs, or even succulents, the plants you select will ultimately reflect your personality and style.
In conclusion, adding personal touches to your wooden flower box is not just about aesthetics; it's about creating something that tells your story. So, unleash your creativity and let your flower box bloom with your unique personality!
- What type of paint is best for outdoor flower boxes?
It's recommended to use exterior-grade paint that can withstand the elements. Look for paints labeled as weather-resistant or formulated for outdoor use.
- How can I ensure the longevity of my flower box?
Sealing the wood with a protective finish and using rot-resistant wood can significantly enhance the durability of your flower box.
- Can I use recycled wood for my flower box?
Absolutely! Recycled wood can add character and charm to your flower box. Just make sure it’s free from harmful chemicals and is structurally sound.
Step-by-Step Assembly Process
Assembling your wooden flower box can be one of the most satisfying parts of the entire project. It’s like putting together a puzzle, where each piece fits perfectly to create a beautiful end product. In this section, we will walk you through the step-by-step assembly process, ensuring you feel confident and excited as you bring your design to life. Remember, patience is key, and taking your time will yield the best results!
The first step in the assembly process is cutting the wood. Before you even think about picking up your saw, make sure you have all your pieces measured and marked accurately. This is crucial because even a small error can affect the overall structure of your flower box. Use a straight edge to draw clean lines where you plan to cut, ensuring that your cuts will be straight and true. When it comes to cutting, take your time. Rushing can lead to mistakes. If you're using a power saw, make sure to follow all safety precautions, such as wearing protective eyewear and keeping your fingers clear of the blade.
Once you have your pieces cut, it's time to move on to assembling the box. Start by laying out all your pieces on a flat surface. You should have at least four sides and a bottom piece. It’s helpful to visualize how everything will come together before you start joining them. Begin with the sides; use wood glue to attach the edges, and then secure them with screws for added strength. A good technique is to pre-drill holes to prevent the wood from splitting. This way, you can achieve a clean and professional-looking assembly.
Next, attach the bottom piece to the assembled sides. Make sure it fits snugly and is flush with the edges. If you’re feeling adventurous, you might want to add a few drainage holes in the bottom to prevent water from pooling, which can be beneficial for the health of your plants.
After the basic structure is secured, it’s time to reinforce the corners. This is where your joinery skills come into play. You can use corner brackets or even create a simple lap joint for added stability. This step is especially important if you plan to have larger plants in your flower box, as they can become quite heavy when watered.
Once everything is assembled, take a step back and admire your work! At this point, you might notice some rough edges or areas that need a little extra attention. Don’t worry; this is normal! Use sandpaper to smooth out any rough spots, ensuring that your flower box will be safe to handle and visually appealing. Sanding also helps the paint or stain adhere better later on.
Finally, before you move on to finishing touches, consider the placement of your flower box. Make sure it’s in a spot that receives adequate sunlight and is easily accessible for watering. Once you have it in the perfect location, you can proceed to the sealing and decorating phases, which will transform your wooden structure into a stunning piece of garden art!
Here are some common questions that DIY enthusiasts often have about assembling wooden flower boxes:
- What type of wood is best for outdoor flower boxes? Cedar and redwood are excellent choices due to their natural resistance to rot and insects.
- How do I ensure my flower box lasts? Sealing your flower box with a weather-resistant finish will significantly enhance its longevity.
- Can I paint my flower box? Absolutely! Just make sure to use exterior-grade paint to withstand the elements.
- How do I prevent the soil from washing out? Adding a layer of landscaping fabric at the bottom of the box can help keep the soil in place while allowing for drainage.
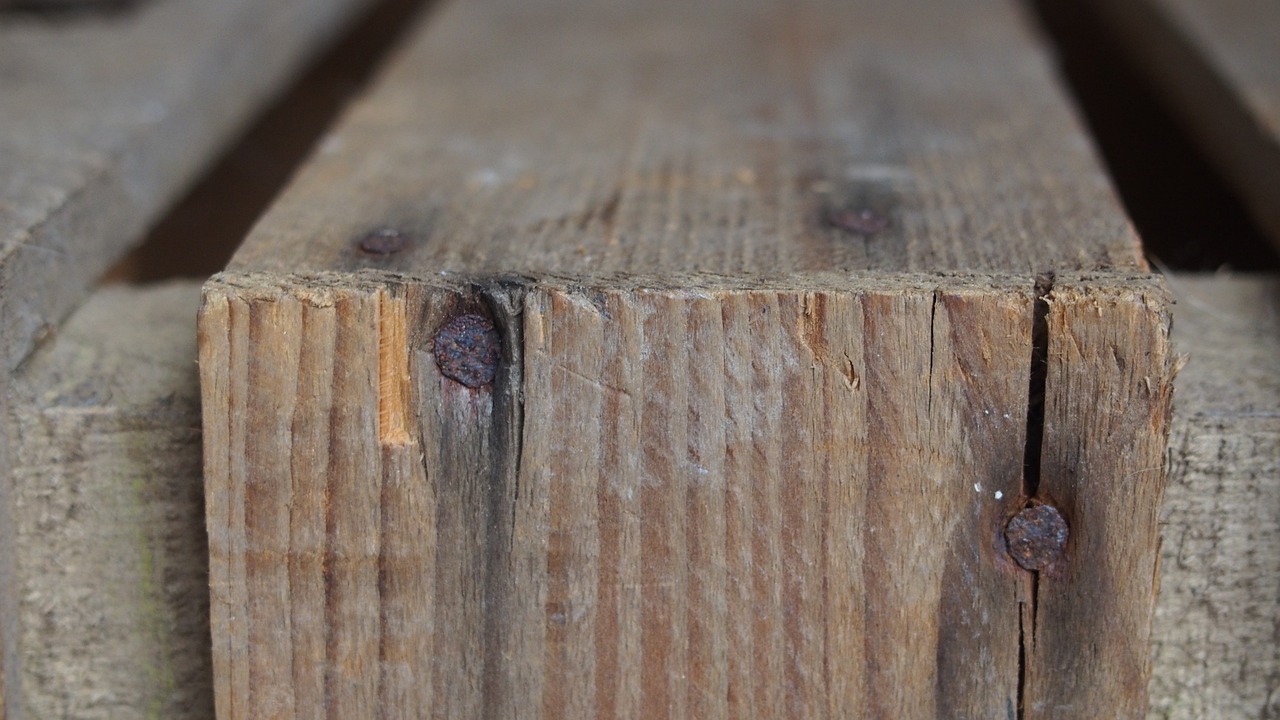
Cutting the Wood
Cutting the wood is the first and one of the most crucial steps in assembling your wooden flower box. This part of the process requires not only the right tools but also a bit of patience and precision. Think of it as the foundation of a house; if the base isn’t solid, everything built on top can crumble. So, let’s dive into some tips and techniques that will help you make those cuts like a pro!
Before you even pick up a saw, it’s essential to plan out your cuts. Take a moment to visualize the final product and sketch a rough design. This will assist you in determining the dimensions you need. For instance, if you’re going for a rectangular flower box, you’ll need to measure and mark the length, width, and height accordingly. Using a measuring tape, mark your measurements on the wood clearly. A pencil is your best friend here—make sure your lines are visible and straight!
When it comes to cutting, the type of saw you choose can make a big difference. Here’s a quick breakdown of some saw types you might consider:
| Type of Saw | Best For |
|---|---|
| Hand Saw | Simple cuts, small projects |
| Circular Saw | Long, straight cuts; faster than hand saws |
| Miter Saw | Angles and precise crosscuts |
Once you’ve decided on your saw, set up a safe and stable work area. Make sure your wood is secured firmly on a workbench or sawhorses. This stability is vital; if the wood shifts while you’re cutting, it can lead to uneven cuts or even accidents. Always wear safety glasses to protect your eyes from wood shavings and debris. Remember, safety first!
As you start cutting, take your time and follow the marked lines carefully. It’s better to make several light passes with your saw than to force it through the wood. This not only ensures cleaner cuts but also reduces the risk of splintering. If you’re using a power saw, let the tool do the work—don’t push too hard!
After you’ve completed your cuts, take a moment to inspect the edges. If you notice any rough spots or splinters, you can smooth them out with sandpaper. This extra step may seem minor, but it can significantly improve the overall appearance of your flower box. Plus, it makes handling the wood safer, preventing splinters that could ruin your gardening experience.
In summary, cutting the wood for your flower box is an art that combines planning, the right tools, and careful execution. With these tips in mind, you’re well on your way to creating a beautiful and sturdy flower box that will enhance your outdoor space. Remember, the quality of your cuts directly impacts the final product, so take your time and enjoy the process!
- What type of wood is best for flower boxes? Cedar and redwood are excellent choices due to their natural resistance to decay.
- Can I use treated wood? Yes, but ensure it’s safe for plants, as some treatments can leach harmful chemicals.
- How do I prevent my flower box from rotting? Sealing the wood with a protective finish will help extend its lifespan.
- What size should my flower box be? The size depends on the plants you intend to grow; consider their root space and growth habits.
Assembling the Box
Assembling your wooden flower box is where the magic truly begins! Once you've cut all your pieces, it's time to bring them together into a beautiful, functional structure. This stage is not just about putting wood together; it's about creating something that will hold life and beauty. To start, lay out all your cut pieces on a flat surface. This will give you a clear view of how everything fits together and help you visualize the final product. Remember, patience is key here; rushing can lead to mistakes!
Begin by taking the side pieces and positioning them upright. Next, grab the bottom piece and place it between the two side pieces. Make sure everything is aligned properly. You can use clamps to hold the pieces in place temporarily, which will make the next steps easier. If you find the pieces are not fitting well, don’t hesitate to adjust them. A snug fit is essential for durability, but it should not be forced. Think of it like a puzzle; each piece has its place, and finding that fit is part of the fun!
Next, you’ll want to secure the pieces together. There are a few methods you can use for this, depending on the tools you have at your disposal:
- Screws: Using wood screws is one of the most reliable methods. Pre-drill holes to prevent the wood from splitting, and then drive in the screws to secure the sides to the bottom.
- Wood Glue: For a seamless look, wood glue can be used in conjunction with screws. Apply glue to the edges before fastening them together. Just remember to clamp the pieces while the glue dries!
- Nails: If you’re looking for a quick assembly, nails can do the trick. However, they may not provide the same strength as screws.
After securing the sides and bottom, it's time to attach the front and back pieces. Align them with the edges of the sides, ensuring everything is square. Again, use clamps to hold them in place while you fasten them. Once everything is assembled, take a moment to check for any gaps or misalignments. If you notice any, a little sanding can help smooth out rough edges and create a more polished look.
Finally, once everything is securely fastened and you’re satisfied with the assembly, it's time for the finishing touches. This might include adding a bottom drainage hole to prevent water from pooling inside the box, which can be detrimental to your plants. Simply drill a few small holes in the bottom before sealing or finishing your flower box. This will ensure that your flowers have a healthy environment to thrive in.
As you stand back and admire your work, remember that assembling your flower box is just the beginning. Next, you'll want to focus on the finishing touches that will protect and beautify your creation. But before we dive into that, let’s address some common questions that DIY enthusiasts often have about assembling flower boxes.
Here are some frequently asked questions that can help clarify any uncertainties you may have:
- What type of wood is best for outdoor flower boxes? Cedar and redwood are excellent choices due to their natural resistance to decay.
- How do I ensure my flower box is waterproof? Sealing your flower box with a waterproof sealant will protect it from moisture.
- Can I use treated wood for my flower box? Yes, but be cautious as some treatments can leach chemicals into the soil. Always check for non-toxic options if you plan on planting edibles.

Finishing Touches
Once you’ve built your wooden flower box, it’s time to add those all-important finishing touches that will not only enhance its beauty but also extend its lifespan. Think of this stage as the icing on the cake; it’s where your flower box goes from being a simple structure to a stunning centerpiece in your garden or on your patio. First and foremost, you’ll want to consider sealing your flower box. This is crucial because wooden boxes are often exposed to the elements, which can cause wear and tear over time. By applying a sealant, you create a protective barrier that keeps moisture out and prevents rot. There are several options available, such as polyurethane, varnish, or even eco-friendly options like natural oils. Each has its own benefits, so choose one that aligns with your environmental values and aesthetic preferences.
After sealing, you can dive into the fun part: decorating! This is where you can truly express your personality and style. Imagine your flower box adorned with vibrant colors or intricate designs that reflect your taste. You can use outdoor-safe paint to add a splash of color or create stencils for a more artistic look. If you’re leaning towards a more natural finish, consider using wood stains that highlight the grain while providing protection. Don’t forget to think about embellishments! Adding decorative hardware, such as handles or corner brackets, can elevate the overall look and add a touch of charm.
Another aspect to consider is the arrangement of plants inside your flower box. Choosing the right plants can complement the design and make your flower box truly stand out. Opt for a mix of colors, heights, and textures to create a visually appealing display. For instance, you might pair tall sunflowers with trailing ivy or colorful petunias. Be sure to consider sunlight and water needs when selecting your plants, as this will ensure they thrive and enhance the beauty of your flower box.
Finally, don’t forget about maintenance! Regularly check your flower box for any signs of wear or damage, especially after harsh weather conditions. A little upkeep can go a long way in preserving the beauty and functionality of your creation. By investing time in the finishing touches, you can transform a simple wooden flower box into a stunning addition to your home or garden that will be admired for years to come.
- What type of sealant should I use for my wooden flower box? It depends on your preference! Polyurethane offers great durability, while natural oils are eco-friendly options.
- How often should I reapply sealant? It's recommended to check your flower box annually and reapply sealant as needed, especially after harsh weather.
- Can I use any type of paint on my flower box? Be sure to choose outdoor-safe paint to withstand the elements and maintain its vibrant color.
- What plants are best for a wooden flower box? Consider a mix of plants that have varying heights and colors, and ensure they have similar sunlight and water requirements.
Sealing for Durability
When it comes to creating a wooden flower box, one of the most crucial steps is ensuring its longevity through proper sealing. Just like a knight dons armor to protect against the elements, your flower box needs a reliable seal to withstand rain, sun, and everything in between. Without this protective layer, your beautiful creation could succumb to rot, warping, or fading, turning your labor of love into a mere memory.
There are several sealing options available, each with its unique benefits. Understanding these options will help you choose the best one for your project. Here’s a brief overview of the most popular sealing methods:
- Wood Sealers: These are specially formulated to penetrate the wood and create a protective barrier against moisture. They are typically clear and can enhance the natural beauty of the wood grain.
- Waterproofing Stains: Combining color and protection, waterproofing stains not only seal the wood but also add a splash of color. They are great for those who want their flower box to pop while ensuring durability.
- Outdoor Varnish: This option provides a hard, glossy finish that is resistant to UV rays and water. It’s perfect for those looking to create a shiny, polished look.
Before applying any sealant, it's essential to prepare the surface of your flower box properly. Start by sanding the wood to create a smooth surface, which helps the sealant adhere better. After sanding, make sure to clean off any dust or debris; a clean surface ensures that your sealant will work effectively.
Once your box is prepped, it’s time to apply the sealant. Follow these steps for the best results:
- Choose a well-ventilated area: This is important for your safety and to allow the sealant to cure properly.
- Use a brush or roller: Apply the sealant evenly, making sure to cover all surfaces, including the edges and corners.
- Let it dry: Follow the manufacturer’s instructions for drying times. It’s often best to apply multiple coats for maximum protection.
After sealing, your flower box will be ready to face the elements. Remember, even with a good seal, it’s wise to check your flower box periodically and reapply the sealant as needed, especially after a harsh winter or a particularly rainy season. By taking these precautions, you'll ensure that your flower box remains a stunning addition to your garden or home for years to come!
Here are some common questions that DIY enthusiasts often have about sealing wooden flower boxes:
- How often should I reseal my flower box? It’s recommended to check your sealant every year and reapply as necessary, especially after extreme weather events.
- Can I use any type of sealant? No, it’s best to use sealants specifically designed for outdoor wood to ensure durability and protection against the elements.
- What if my flower box is already showing signs of wear? If you notice peeling or fading, sand down the affected areas and apply a fresh coat of sealant to restore protection.
Decorative Options
When it comes to making your wooden flower box truly stand out, the are where your creativity can really shine. Think of your flower box as a blank canvas, waiting for your artistic touch. From painting and staining to embellishing with various materials, there are countless ways to personalize your creation. One of the simplest yet most effective methods is to choose a color that complements your garden or home decor. A fresh coat of paint can breathe new life into a plain wooden box, and the best part is, you can easily switch it up whenever you feel like a change!
For those who prefer a more natural look, consider using wood stains. Staining not only enhances the grain of the wood but also provides a protective layer against the elements. You can opt for a transparent stain to show off the natural beauty of the wood or a solid color stain for a more uniform appearance. If you’re feeling adventurous, why not try a two-tone effect? Imagine a deep mahogany base with a lighter top—such a combination can add depth and visual interest to your flower box.
But wait, there’s more! You can also incorporate various embellishments to make your flower box unique. For instance, consider adding stencils or decals. You could stencil your favorite quote or a whimsical design onto the sides of the box. This adds a personal touch that reflects your personality and style. If you’re into a more rustic vibe, think about attaching some twine or burlap for a charming, country feel. You might even want to add small decorative elements like wooden hearts or flowers—these can be easily glued on and will create a delightful focal point.
When selecting decorative options, it’s important to consider the overall theme of your garden or outdoor space. If your garden is filled with vibrant flowers, you might want to keep your flower box decorations more subdued to let the plants shine. Conversely, if you have a more minimalist garden, a bold and colorful flower box can become the star of the show! The key is to find a balance that works for you.
Lastly, don’t forget about the practical aspects of decoration. Ensure that any paint or stain you use is outdoor-safe and non-toxic, especially if you plan to grow edible plants in your flower box. A little research can go a long way in ensuring your decorative choices are not only beautiful but also safe for your plants and the environment.
Q: Can I use any type of paint on my wooden flower box?
A: It's best to use outdoor-safe, non-toxic paints designed for wood. Look for options that are weather-resistant to ensure longevity.
Q: How do I protect my flower box from water damage?
A: Sealing the wood with a waterproof sealant or using a wood stain that offers protection can help prevent water damage and prolong the life of your flower box.
Q: What are some easy embellishments I can add to my flower box?
A: Simple embellishments include stencils, decals, twine, or even small wooden shapes. Get creative and think about what reflects your personal style!
Q: How often should I repaint or restain my flower box?
A: Depending on the weather conditions in your area, you may need to repaint or restain your flower box every 1-3 years to keep it looking fresh and vibrant.
Frequently Asked Questions
- What type of wood is best for flower boxes?
Choosing the right wood is essential for durability and aesthetics. Cedar and redwood are popular choices because they are naturally resistant to rot and insects. Pine is also a good option, but it may require additional treatment to withstand the elements.
- Do I need special tools to build a flower box?
While you can get by with basic hand tools like a saw, hammer, and measuring tape, having power tools can make the process much smoother and faster. Tools like a power saw and drill can save you time and effort, especially for larger projects.
- How do I ensure my flower box is the right size?
The size of your flower box should depend on the plants you intend to use and the space available in your garden or home. Measure your planting area and consider the growth of the plants to determine the appropriate dimensions for your box.
- What are some creative ways to decorate my flower box?
Personalizing your flower box can be a fun part of the project! You can paint it in vibrant colors, use stencils for designs, or even add embellishments like rope or decorative handles. Natural finishes like wood stains can also enhance its appearance while protecting the wood.
- How do I seal my flower box for durability?
Sealing your flower box is crucial for protecting it from moisture and weather damage. You can use a clear wood sealer or a waterproofing product specifically designed for outdoor use. Make sure to apply it according to the manufacturer's instructions for the best results.
- Can I use my flower box indoors?
Absolutely! Wooden flower boxes can be a beautiful addition to your indoor decor. Just make sure to line the box or use a plastic liner to protect it from water damage when watering your plants.
- How do I maintain my wooden flower box?
Regular maintenance is key to keeping your flower box looking great. Check for signs of wear and tear, and reapply sealant as needed. Cleaning the box with mild soap and water will also help prevent mold and mildew buildup.


